Importing your fixtures
Do you have a spreadsheet of your fixtures? Follow our tutorial to upload all of your team's fixtures in bulk into your teamo calendar.
Set the Competition
Before you start, if your team is part of a league/competition, make sure that your team is connected to the relevant league. To do this, go to Contacts > Teams > Select your team > Edit > Add Competition and enter the Competition details.
Upload your File
To import your fixtures, login on desktop, then head to Settings > Manage Club > Import Fixtures. Import your spreadsheet from a file on your computer.
If your spreadsheet is in a similar format to this table, please click here:
| Premiership | 25/11/2017 | 1s | Bristol | H | 15:00 | Battersea Park |
| Conference | 25/11/2017 | 2s | Manchester | A | 14:00 | Didsbury Park |
| Division 2 | 25/11/2017 | 3s | Bath | H | 13:00 | Battersea Park |
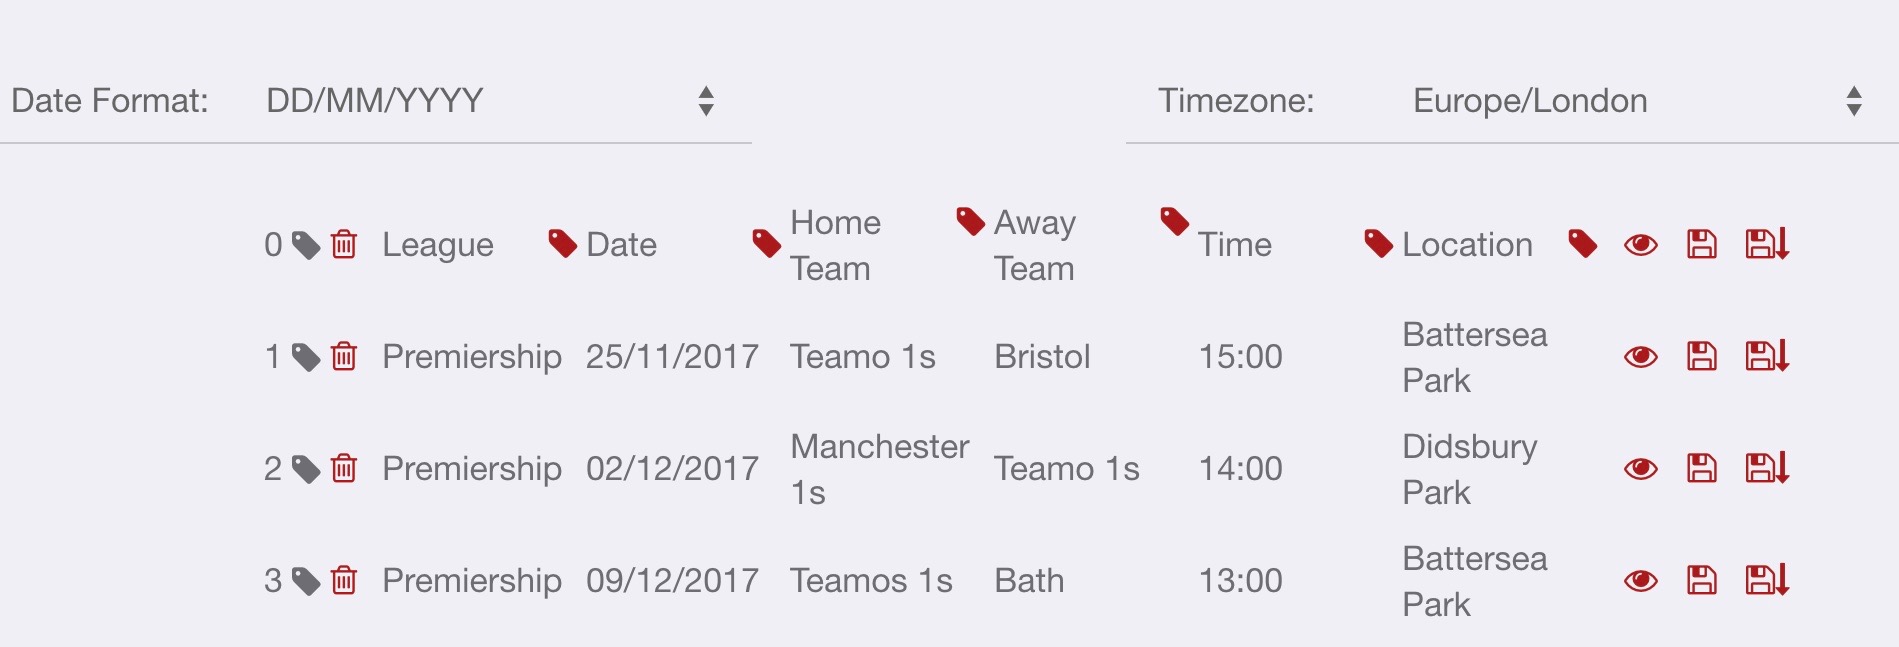
If your spreadsheet looks like this, please click here:
| Premiership | 25/11/2017 | Teamo 1s | Bristol | 15:00 | Battersea Park |
| Premiership | 02/12/2017 | Manchester | Teamo 1s | 14:00 | Didsbury Park |
| Premiership | 09/12/2017 | Teamo 1s | Bath | 13:00 | Battersea Park |
Method 1
The fixtures will then open in a new window in a similar format to below.
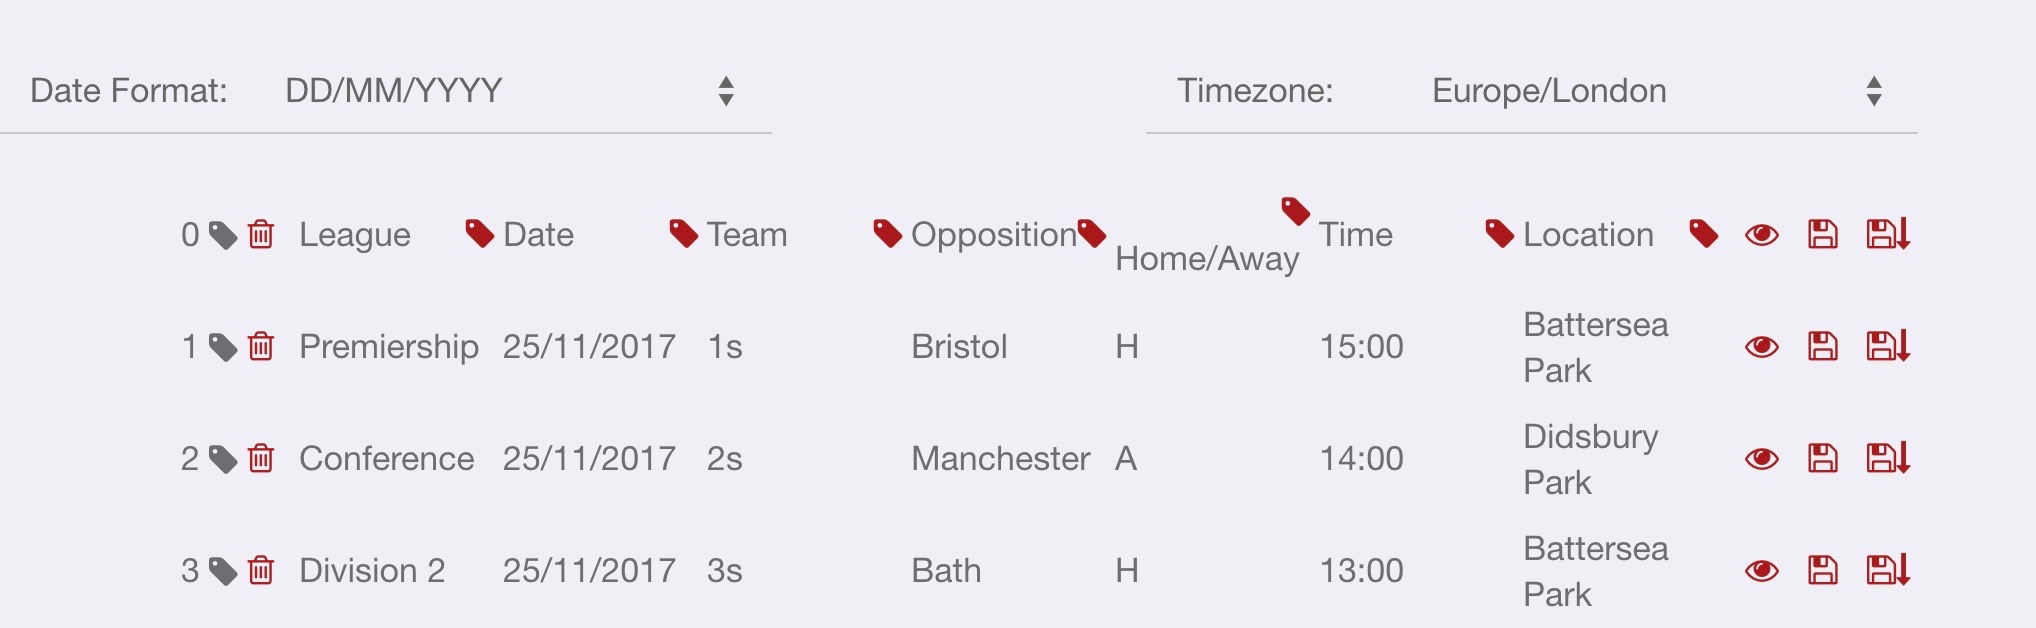
Label the columns
Now, you need to set the column headings:
- Firstly, set the Date Format and Timezone.
- Click the label icon at the left hand side of the heading row then select Heading.
- Delete any blank rows or columns by clicking on the bin icon for the rows. To remove a column, select the label icon of the column and then Delete Column .
Now, click on the label icons next to each column title to give them a heading. For example:
- League= Competition Indicator
- Date= Date/Fixture Start Date
- Team My Team Indicators
- Opposition= Opposition
- Home/Away= Home/Away
- Time= Match Time
- Location= Venue/Location
Edit the information
Your screen should then look something like this. The columns which are green are all set but now you need to edit the red cells.
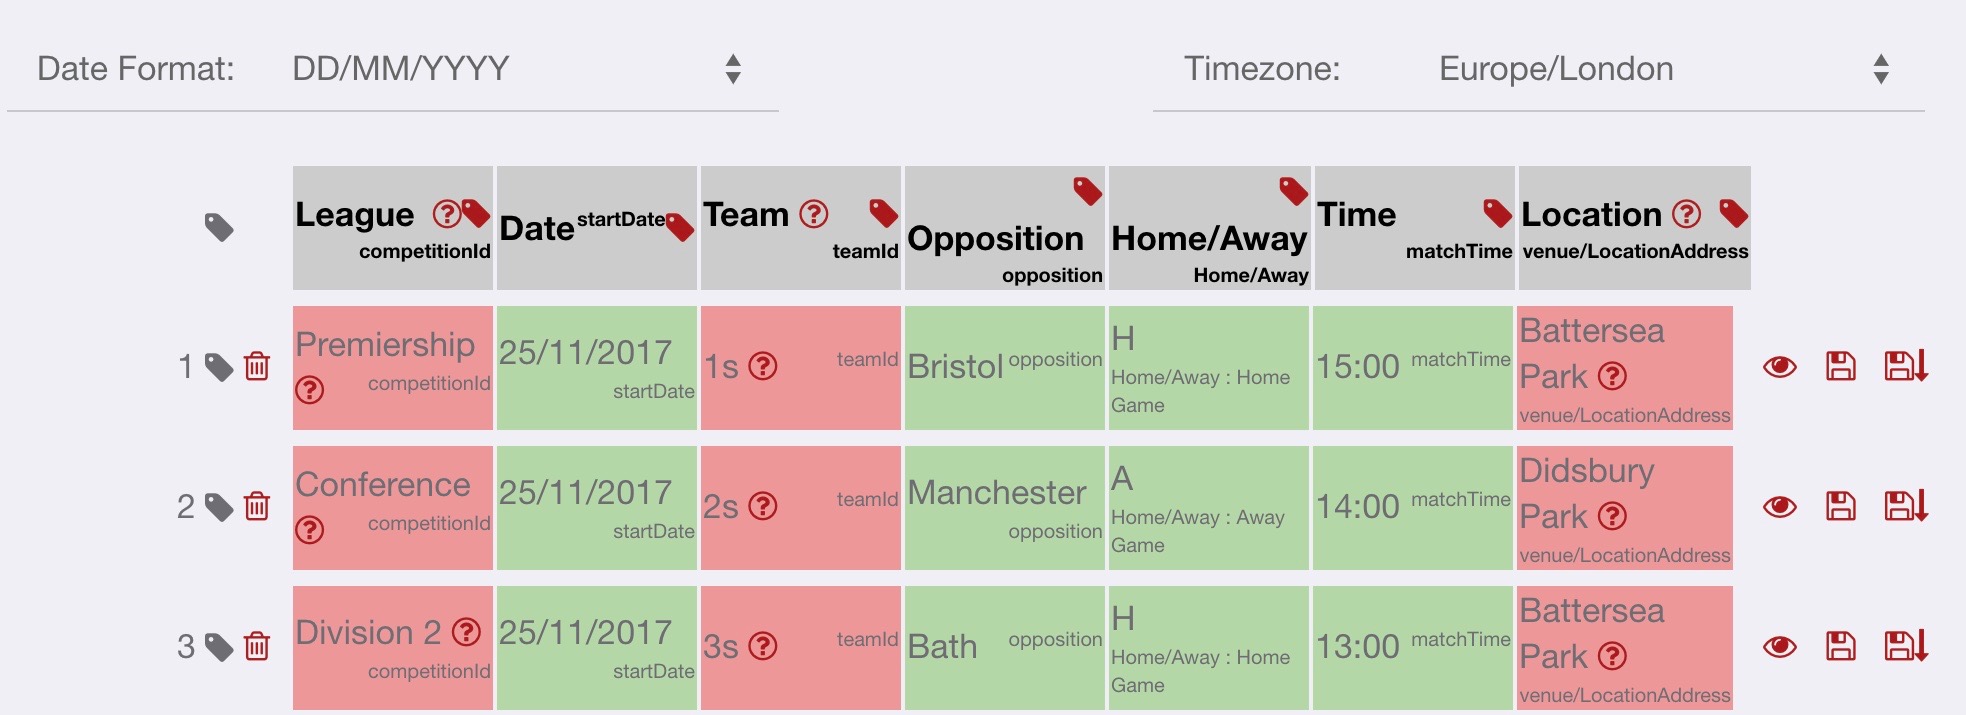
If you have a League/Competition Indicator column, tap the ? icon next to the name of the league (e.g. Premiership). A window then appears on the right hand side and you need to select the relevant league. (The options that appear are from the competitions that you have linked to each team- see first note in this tutorial). The cells will then turn green for all the fixtures that you have uploaded that are in that competition.
For the Team column, select the ? icon and select from team options that appear on the screen. The teams that appear here are the ones you have set up. If you need to add more teams, please go to Settings > Manage Club > Edit Teams/Groups. Repeat this for each of your teams until the entire column is green.
For Location, click on the ? icon next to the venue name (e.g. Battersea Park), then click New Location on the right hand side. Select whether the venue is Home or Away. The venue will then pop up and the system will load the address. If the picture does not load or the details are wrong, edit the details and then click Save. After you have entered the address once, it will then appear in the list of fixture locations to use in the future. Do the same for each venue and the cells will turn green.
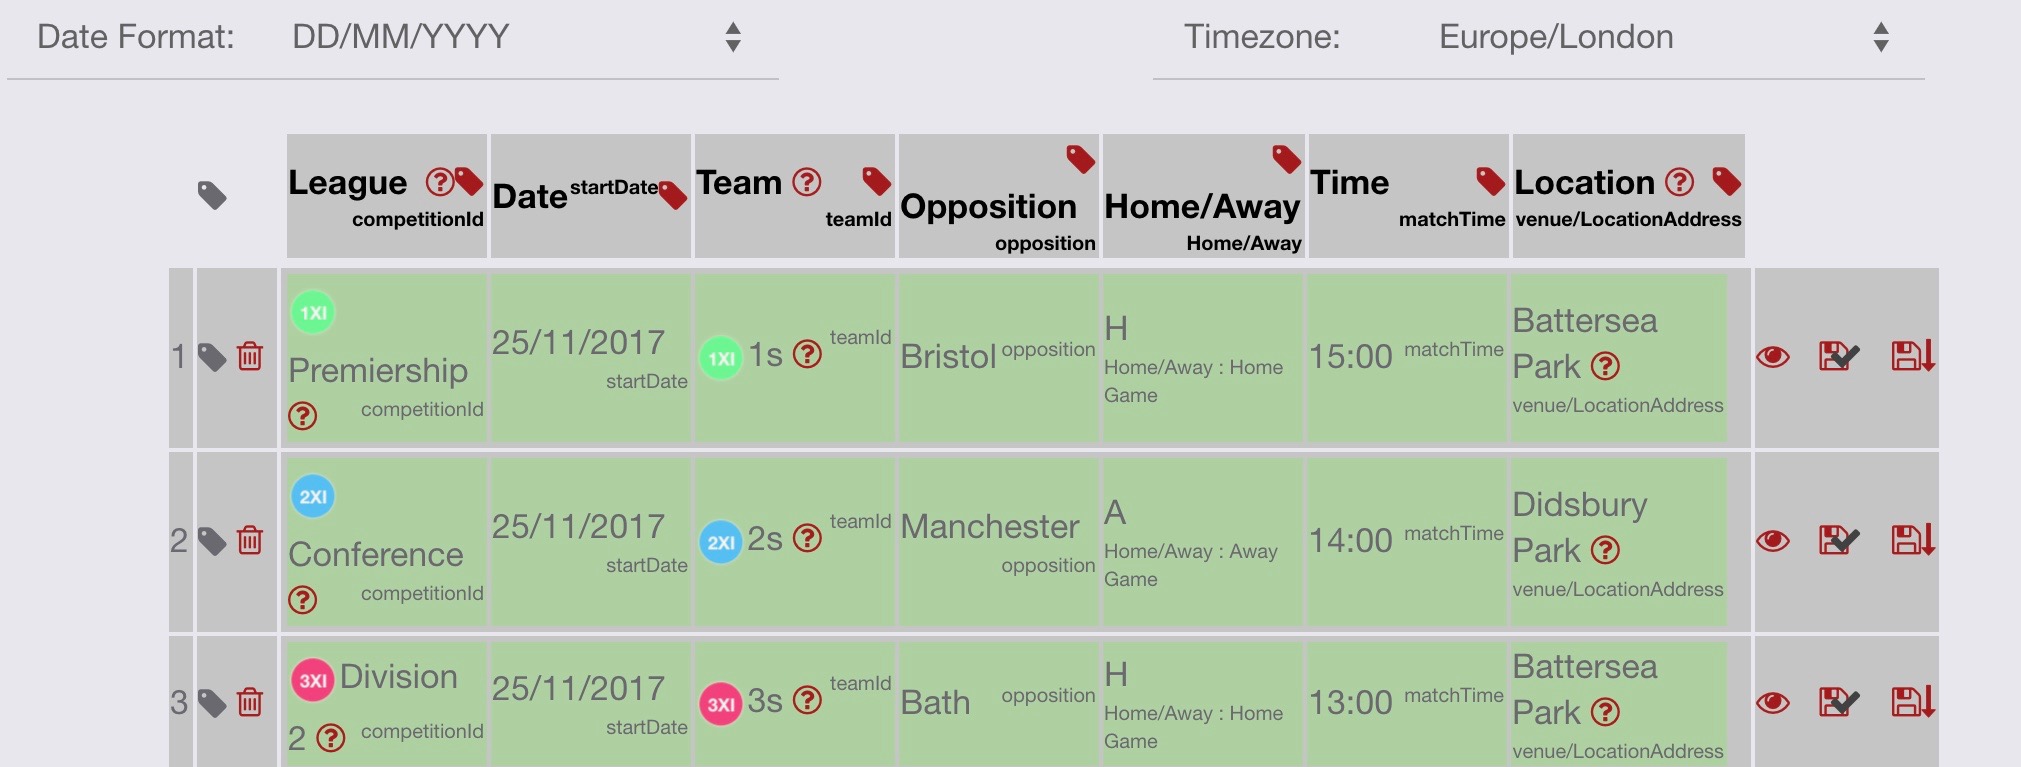
Preview and Save
To preview a fixture, click on the eye icon at the end of the row. This shows what the fixture will look like in your Calendar. If you are happy with all the fixtures, click on the save icon with the arrow to save all fixtures to your Calendar. You will then be asked if you want to set reminder prompts for your players. To save one fixture, click the save icon without the arrow. Once all the fixtures have a tick over the saved button, click Exit in the top right corner. Your fixtures will then appear in the Calendar.
Method 2
The fixtures will then open in a new window in a similar format to below.
Label the columns
Now, you need to set the column headings:
- Firstly, set the Date Format and Timezone.
- Click the label icon at the left hand side of the heading row then select Heading.
- Delete any blank rows or columns by clicking on the bin icon for the rows. To remove a column, select the label icon of the column and then Delete Column .
Now, click on the label icons next to each column title to give them a heading. For example:
- League= Competition Indicator
- Date= Date/Fixture Start Date
- Home Team= Home Team
- Away Team= Away Team
- Time= Match Time
- Location= Venue/Location
When you are asked to label the Home Team column and Away Team column, a pop up will appear asking you to enter your team name. Type in your team name exactly as it appears in the spreadsheet e.g. Teamo 1s. Do the same for the Away Team column.
Edit the information
Your screen should then look something like this. The columns which are green are all set but now you need to edit the red cells.
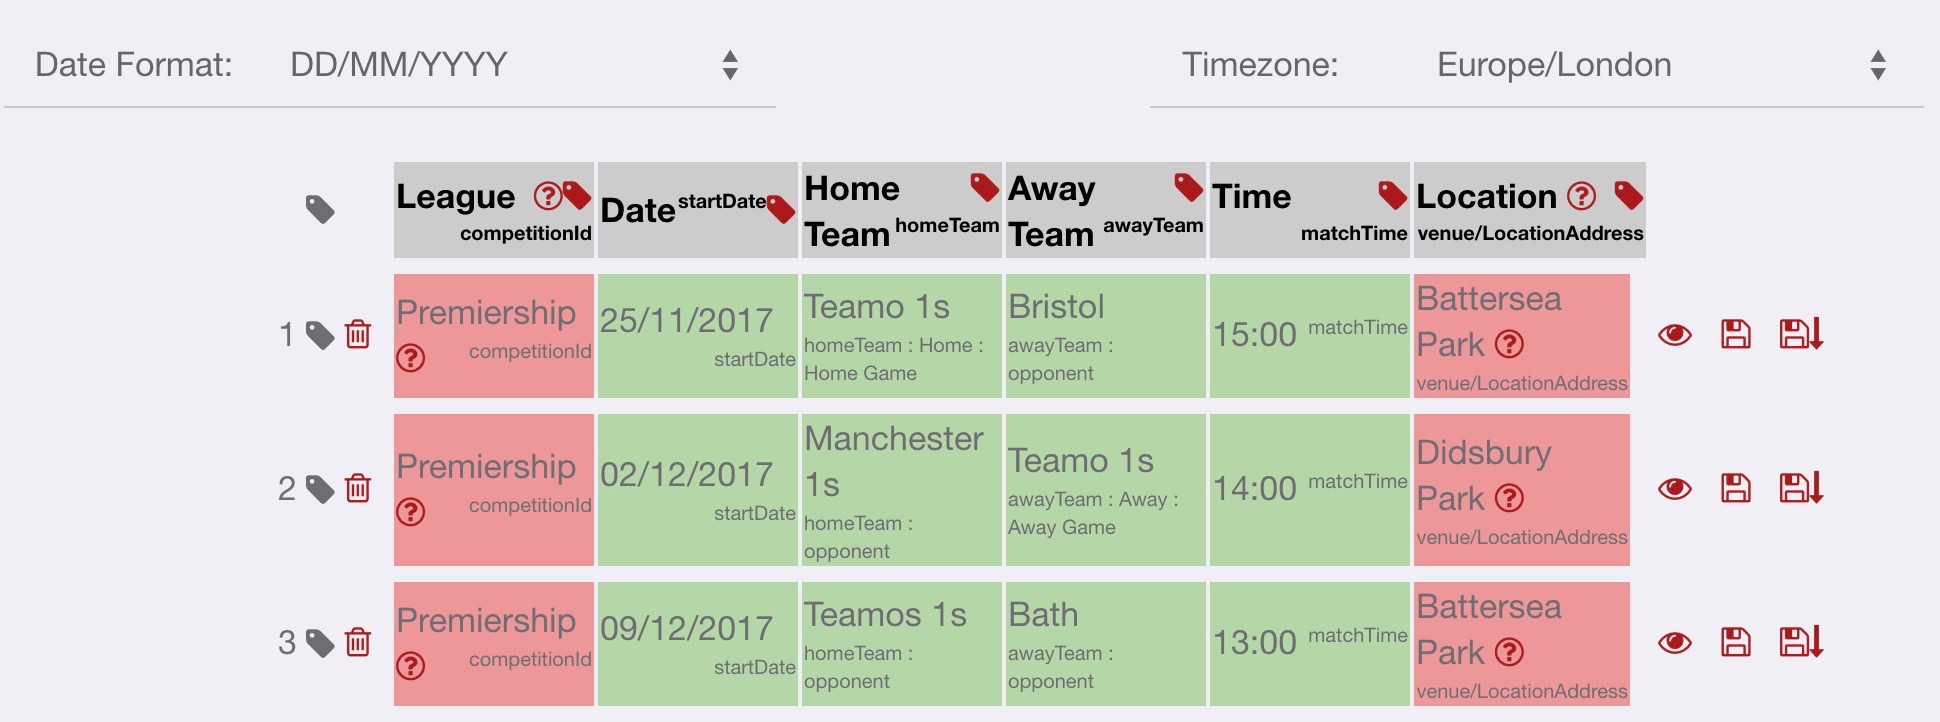
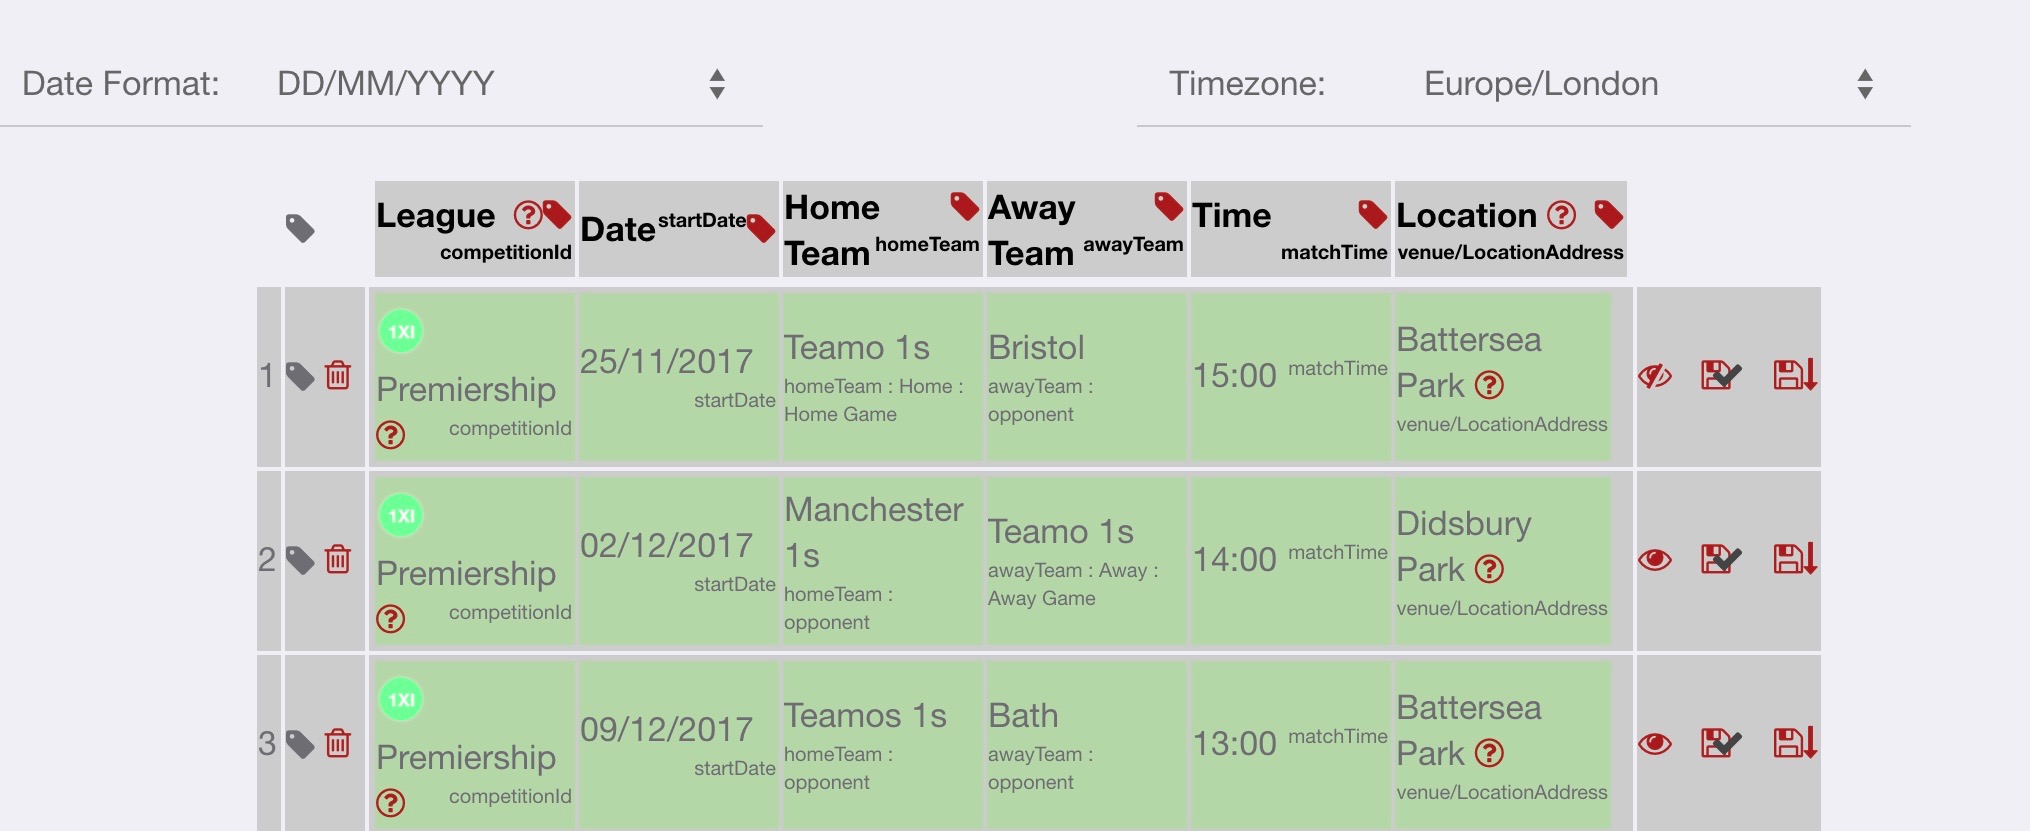
If you have a League/Competition Indicator column, tap the ? icon next to the name of the league (e.g. Premiership). A window then appears on the right hand side and you need to select the relevant league. (The options that appear are from the competitions that you have linked to each team- see first note in this tutorial). The cells will then turn green for all the fixtures that you have uploaded that are in that competition.
For Location, click on the ? icon next to the venue name (e.g. Battersea Park). Then click New Location on the right hand side. Select whether the venue is Home or Away. The venue will then pop up and the system will load the address. If the picture does not load or the details are wrong, edit the details and then click Save. After you have entered the address once, it will then appear in the list of fixture locations to use in the future. Do the same for each venue and the cells will turn green.
Preview and Save
To preview a fixture, click on the eye icon at the end of the row. This shows what the fixture will look like in your Calendar. If you are happy with all the fixtures, click on the save icon with the arrow to save all fixtures to your Calendar. You will then be asked if you want to set reminder prompts for your players. To save one fixture, click the save icon without the arrow. Once all the fixtures have a tick over the saved button, click Exit in the top right corner. Your fixtures will then appear in the Calendar.
If you would like more assistance or have any questions please fill out the contact form below and a member of the team will be in touch.